Wednesday, December 31, 2014

Tuesday, December 30, 2014

How to Make a Fresh Native Christmas Wreath


Christmas is over for another year, but my Christmas wreath is still looking good!  In the pre-christmas rush, I took a little time to photograph the steps to making a simple, native wreath.  Unfortunately, I didn't have time to blog … but better late than never, I thought I'd sneak it in before the New Year!


For this simple fresh wreath, I start with a 12" floral foam wreath.  They are available from floral supplies stores, usually under $10.  I soak the floral foam so that it is completely full of water before I begin.  


I like to begin by selecting all the materials I want to use and have them on the table around my work space.  I love to create combinations of foliage - subtle colours and textures that really give the wreath a special something!  For this wreath, I start with some sprigs of Tasmanian myrtle beech foliage.  It is really fresh at this time of year.  The new seasons growth has changed from red to rich glossy green. 
I cut sprigs the right length, and remove the leaves from the bottom few centimetres of the stem.  I cut the stems on an angle so that they are sharp and firm to press into the floral foam.  I work my way around the wreath until all the sprigs are evenly spaced.  I don't worry too much about neatness at this stage - its good to work quickly to build up the layers. 


Next, I add some fir that I've foraged from the garden.  I like the contrast between it and the myrtle beech.  I also like the structure of the fir and the way it provides a fuller look to the wreath.  It's important to remove the small needles from the stems of the fir sprigs before they are pressed into the foam, otherwise they won't hold firmly. This can be a little fiddly.   I add a small amount of  myrtle to the centre of the wreath at this stage too.  


Next, I add some sprigs of wax flower.  They add another dimension of green but also provide beautiful little highlights with the flowers that peep out.  The wax flower adds a beautiful honey scent too.  


With each layer of green, I try to balance the wreath, filling gaps and creating a nice shape but also thinking about covering the outer and inner edges of the floral foam so that they don't stand out and detract from the finished product.  


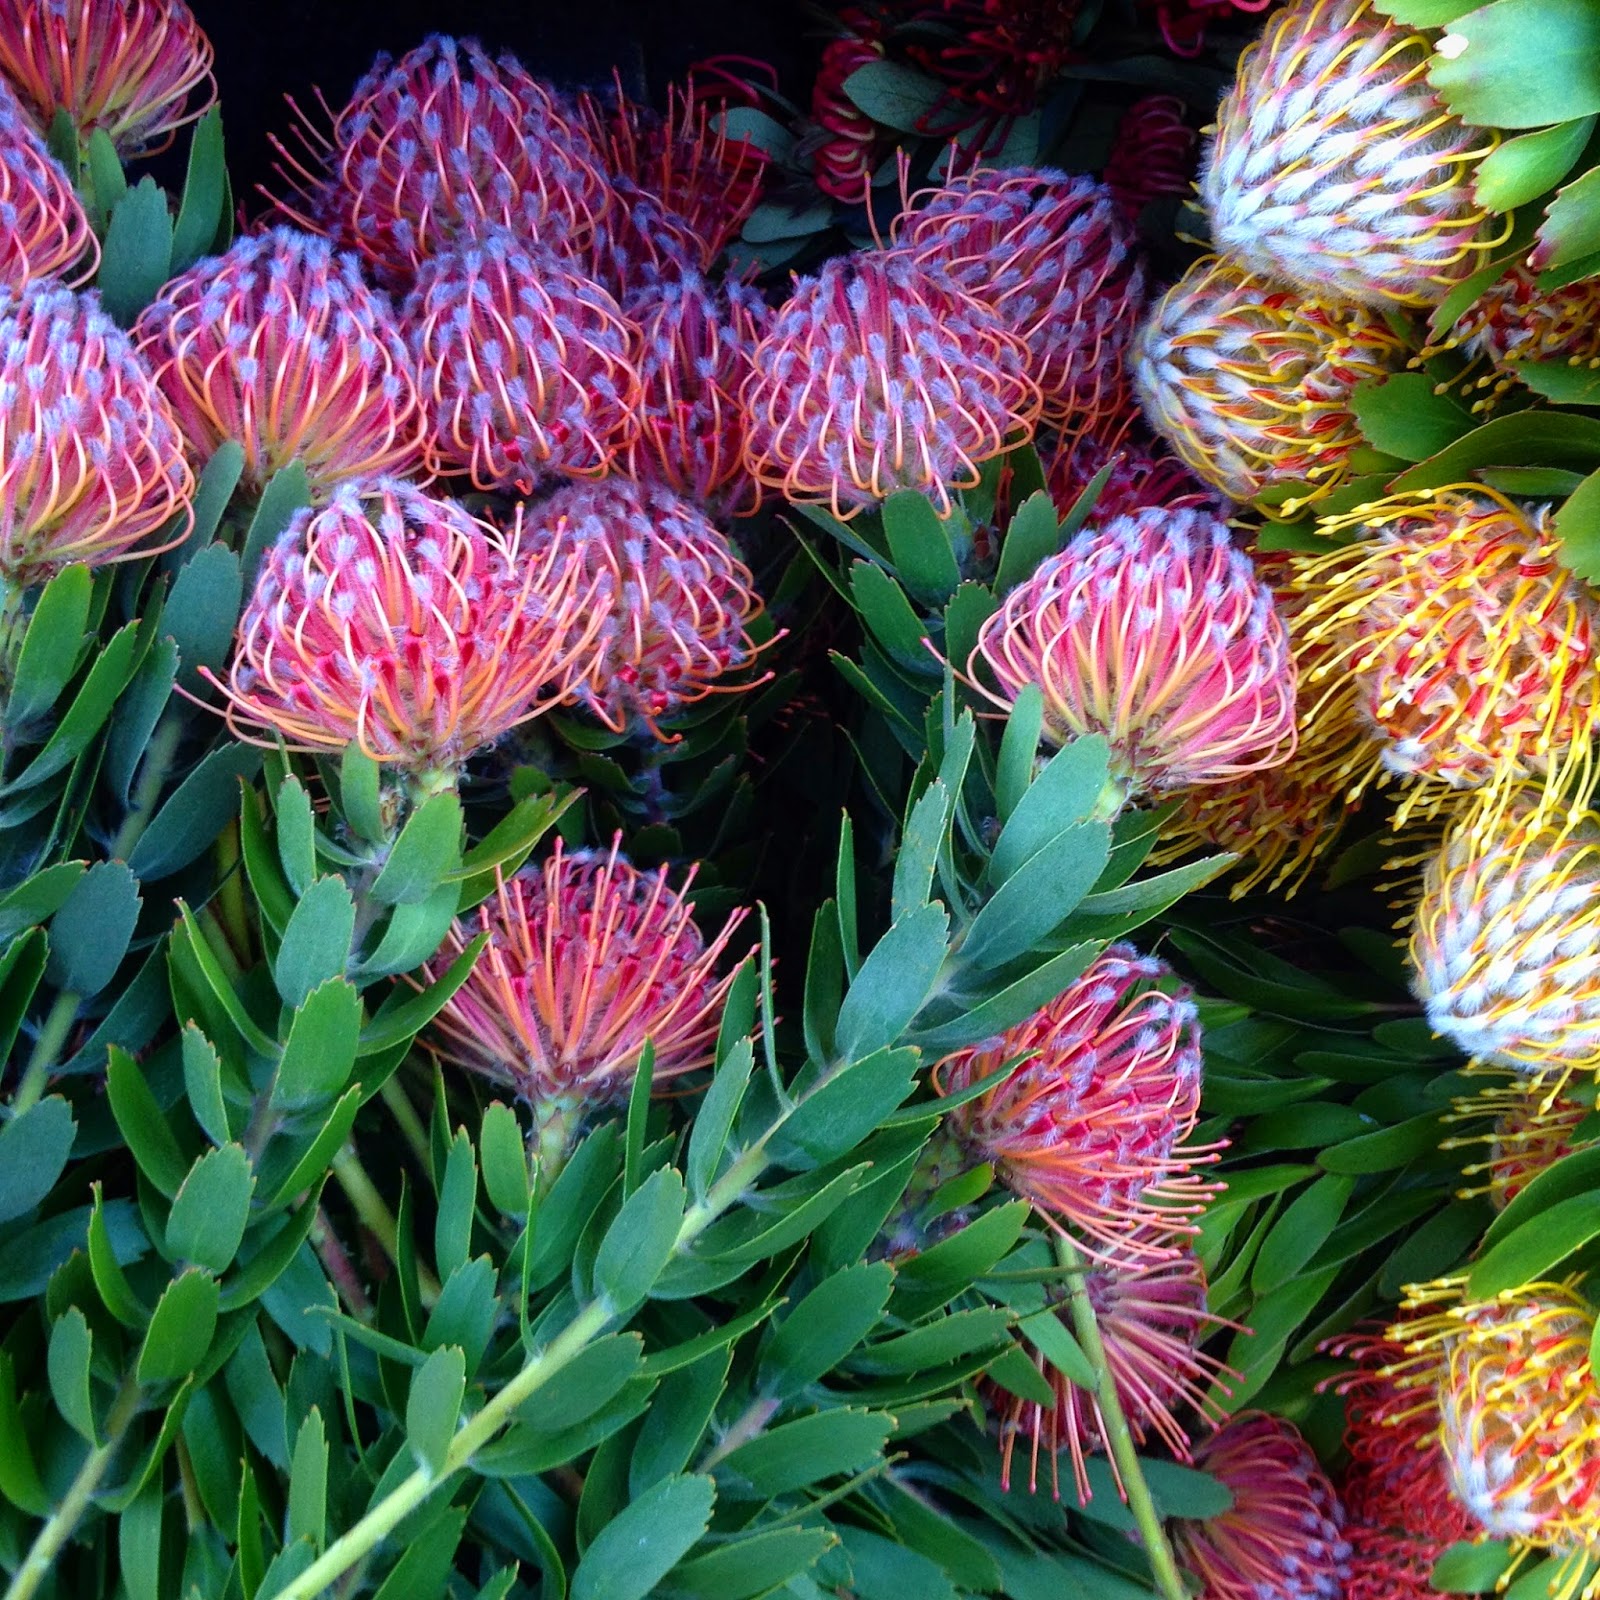
Next, I added some Leucadendron Maui Sunset.  They are a light fresh green at this time of year, with pink tips.  In this picture you can see that all the sprigs and flowers are pressed into the foam in the same direction, sweeping around the arc of the wreath.  This is important for the design of the wreath.  If things are added in different directions, the wreath can get really untidy and doesn't come together harmoniously. 


With this wreath, I decided to use just the one main flower to bring the design together.  
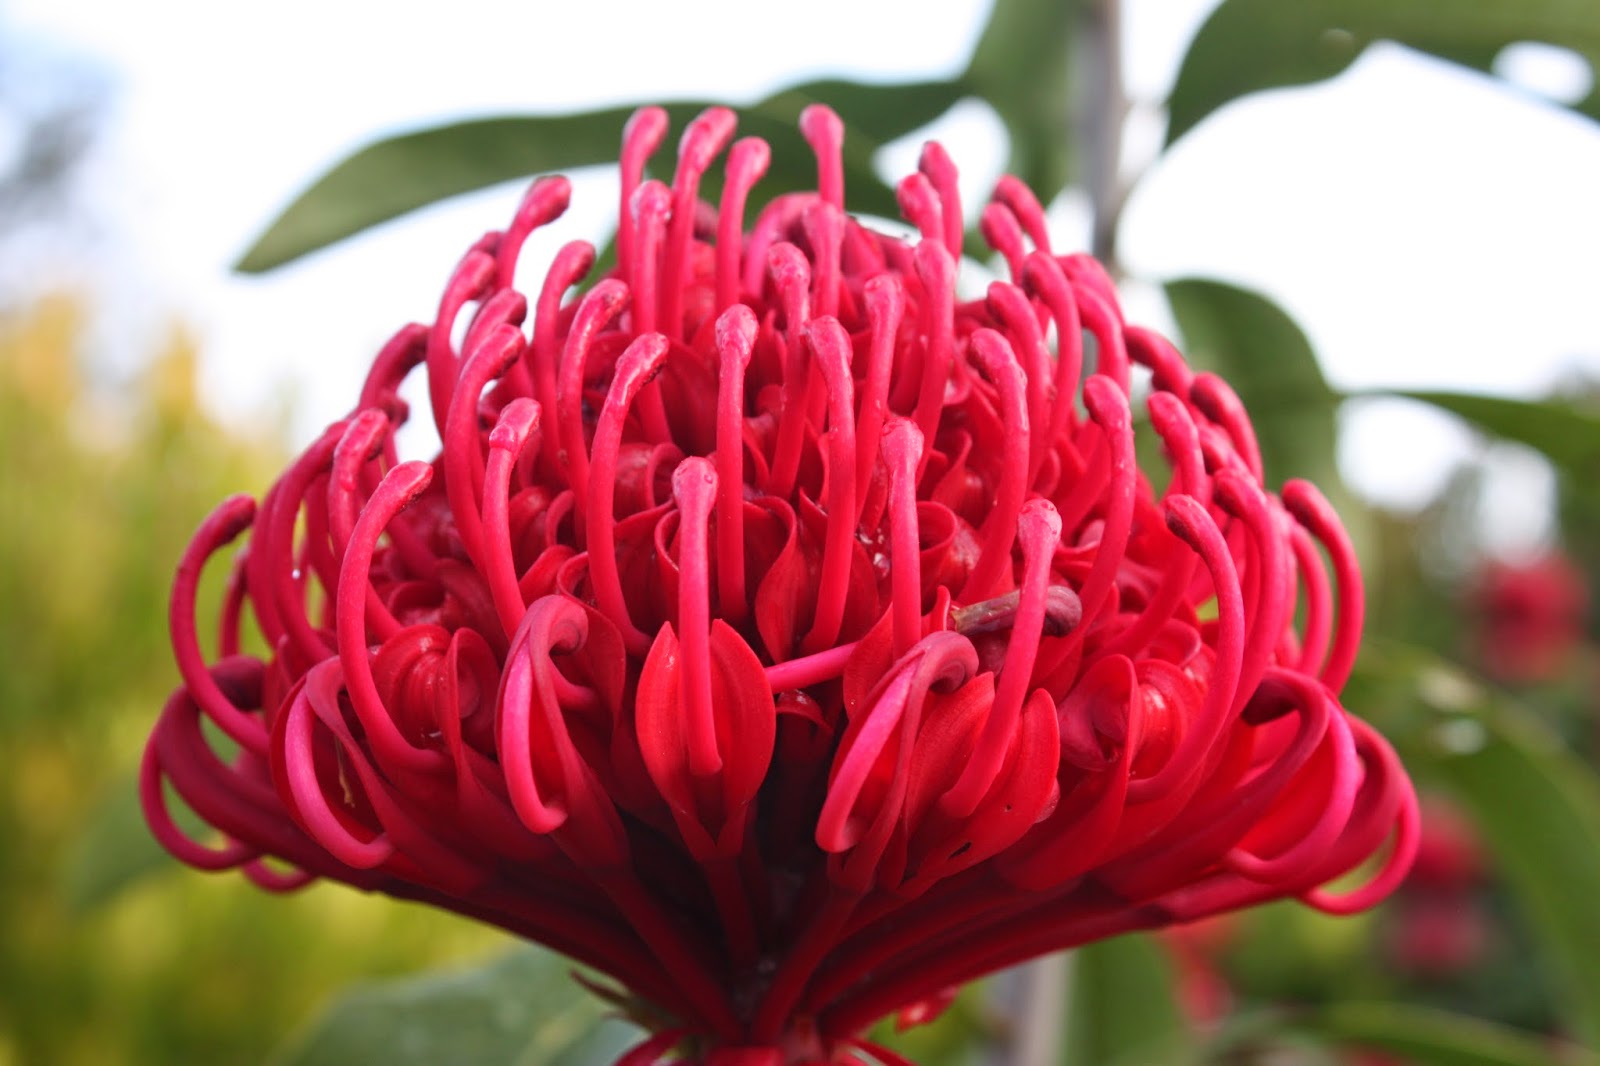
Leucospermum Scarlet Ribbons is a great christmas flower.  The 12" wreath fits 5 of these flowers really well in s sort of star shape.  Odd numbers are generally more pleasing, visually.  4 flowers would detract from the circle shape of the wreath, making it look too square.  I cut the stems quite short, and remove all the leaves before pressing the first flower firmly into the centre of the band of floral foam. 


The placement of the 5 Leucospermums or Pincushions is quite important because they really stand out as the main feature of the design.  The first flower is placed and then the others are added carefully to create the 5 points of an invisible star. 


Adjust the flowers carefully until they are well spaced and sitting evenly. 


The final stages of the wreath involve adding the special touches and filling the gaps, adjusting until everything sings! This year I really enjoyed adding little sprigs of holly to my wreaths.  I have a holly bush that is slowly getting big enough to pick from.  Wear gloves when picking and preparing it though as it is really prickly!  Again, the springs are cut on a sharp diagonal and the bottom leaves are removed.  I press the holly sprigs into the wreath in relation to the 5 main flowers now, emphasising the design.


Another of my favourite additions to fresh native wreaths are gum nuts.  These are dried ones that I have left over from projects through the year.  They have short stems so are suited to wreaths.  Again, once those 5 main flowers have gone in, everything that is added has to be in harmony with them.   I add the gum nuts in between each flower.  I find that sprinkling them is better than placing them too neatly, because they look more natural.

In the above picture, you can also see a white rice-flower like bloom.  These are a native that grow wild on my farm and flower in summer.  I have a few different varieties, commonly known as Dolly Bush.  I am unsure if they are a Cassinia or an Ozothamnus - I think there is an overlapping there.  But if they are picked at exactly the right time, the lovely bright flower heads don't droop and and really useful to brighten up summer arrangements.  You can see a gap on the wreath where the floral foam is showing. Dolly Bush is one of the things I've used to fill in these gaps.  More little sprigs of foliage are good too.


Another of the final touches is to add Leucadendron Jubilee Crown.  These are often called "Christmas Cones" and look particularly festive.  The cheery red cones are great little highlights that add an extra dimension to the wreath.  Again, I remove all the fine needle-like leaves and cut the stems sharply before sprinkling them throughout the wreath.


Eventually, all the gaps are filled and the highlights are added.  I stand back and make sure the wreath is looking balanced.


These wreaths are lovely addition to a festive table.  Add a nice fat candle to the centre and use them as a table centrepiece.  If you remember to add a little water each day, the wreath will outlast even the typical Christmas leftovers of ham and turkey!  

I hope you all had a happy Christmas season and wish you all the best for a productive and happy New Year, with plenty of time to seek out the beauty in each day.  Thanks so much for all your support and kind comments throughout the year.

Friday, December 19, 2014

Pincushion Proteas

Spring and early summer are so busy here!  Every year I lament the fact that Christmas falls in our busy season in the Southern Hemisphere.  How nice it must be to have Christmas in the quieter months!  There are definitely some benefits of a summer Christmas though - fresh berries and stone fruit and summery tropical fruits - pavlova drenched with summer berries, long days (with daylight savings) and the long relaxing twilight, trips the beach …. ok, I take it back.  I love Christmas in summer!  But it sure is a busy time of year.  


 I can't imagine Christmas time without flowers either.  Leucospermums, commonly called Pincushions are in full bloom here in late spring and into summer.  They have become synonymous with summer for me.  I am picking trailer-loads of them at the moment and so I thought I'd show off a few. 


   Leucospermums are from the Protea family.  They are a South African plant, as many proteas are, but are closely related to many Australian native plants.  The variety above is a hybrid called Mardi Gras.  The buds are silvery and hairy and are actually a composite of many tiny flowers seeming to create a single flower head.

L. Mardi Gras
As they open the colour is revealed.

L. Mardi Gras
The "pins" from which they get their common name, "pincushion",  are yellow in the Mardi Gras variety.  They emerge from the the special petal called a tepal.  When the style pops out the tepal curls inward revealing another colour, in this case bright red.  The pins begin to emerge from the outer edge of the bloom first and work their way in to the centre until all the pins are sitting out.


Pincushions flower over a relatively short period, but it is quite intense, with the bushes being covered with flowers.  


Fully grown Mardi Gras bushes are laden with flowers in early December.  


The Mardi Gras are usually the first variety to flower at Swallows Nest Farm.  They are closely followed by these gorgeous red Pincushions called Scarlet Ribbons.  I love the colouring of these flowers.


When they first begin to open, the pins are a salmon pink and the hairy tepals give a purplish tinge to the overall look of the flower.  


But as they open more, it becomes obvious why the variety was named "Scarlet Ribbons" as the inside of the tepals is a rich scarlet red.  

Fresh Wreath by Swalllows Nest Farm with Scarlet Ribbons Pincushions
Of course, this is great for Christmas time!  Leucaspermums are great in fresh wreaths.

Mixed Pincusion bunches for Christmas
Christmas bunches often look like this!  Bright summery colours.  
The next Pincushion to flower here is the orange Leucospermum Cordifolium,  with bright orange flowers and long slender stems.  

Leucospermum Cordifolium
This variety tend to flower over a more extended period of time so we get to enjoy them for longer.  I love the little yellow stigma on the end of each style, glowing like little lights.  

The Cordifolium isn't hairy like the other varieties I've mentioned, and the overall shape is more rounded.  You can see from the photo above how the Leucospermum is clearly related to some of our Australian plants from the protea family.  Grevilleas flower in much the same way, with bundles of small "flowers" arranged to create what we call the flowerhead.  And the styles and tepals are similar too.  

Grevillea


Cordifoliums are such a happy flower! Those bright yellow stigma at the end of the pins really glow don't they!

Fresh Christmas Wreath with Cordifolium, Wax Flower, Gum Nuts and Leucodendrons
I love the citrusy colour combinations that you can create with Pincushions - so fresh and summery.

Leucospermum Fountain

Our last variety to flower, beginning towards the end of December and continuing into January, is the gorgeous Leucospermum Fountain.  It's a different shape to the others, being more flattened and open.  It has a softer, subtle orange colouring but with the purplish tinge to the tepals, like the Scarlet Ribbon variety. 

Leucospermum Fountain


You can see the difference in colouring here, between the Fountain on the left, and the Cordifolium on the right (theres a Mardi Gras in the middle there too).  The softer apricot of the Fountain is really appealing and great to mix with purples, pinks and soft blue green eucalyptus foliage.  


The colour of Fountain gets richer as they age.  


Fountain can continue to flower even into February here.  I used it in a February wedding this year.  The bridesmaids were wearing apricot and the Fountains really looked great!


Pincushions, or Leucospermums are a great summer flower, and really create a summery Christmas feel.  Enjoy them when they're available!


Monday, October 27, 2014

Waratah!


Spring means Waratahs, the irrepressible native flower that's bold and impossible to ignore!  Waratahs are native to Australia and are part of the proteaceae family of plants.  The name Waratah is an aboriginal word meaning 'red flowering tree'.  The botanical name is Telopea which means 'seen from afar'.  There are a small number of Telopea species, only 5, with the biggest and most showy being Telopea Speciosissima from New South Wales.  It is that states floral emblem.  At Swallows Nest Farm we grow a number of types of waratahs including the Tasmanian Waratah, Telopea Truncata.  First to flower are the Shady Lady - they are a rich cool red.  "Shady Lady" is a hybrid form of Waratah, a cross between the T. Speciosissima and T. Oreades.


Waratah buds form at the end of long stems which grow mainly over the spring and early summer months.  The buds swell over winter and in early spring, start to become a brighter red. 


Usually sometime in September, the buds start to unfold to reveal the many small flowers inside that will become the centre of the waratah. 


The unfolding process can take some time, and I think the flowers are really beautiful during this stage.


Once the outer bracts have unfolded, the central mass of individual flowers begin to bend and spread out, giving the waratah its well known shape.  


We still don't pick at this stage.  The flowers are prone to develop a blue tinge if picked too early.  They don't maintain their intense colour and won't open properly.


It's best to pick as the first few styles emerge from the individual flowers.  You can see in the picture above that the styles have begun to emerge on the back of this flower - facing north.  At the front edge you can just see the styles beginning to poke their way through.  The petal will fold as they emerge. 


  In the picture, almost all the styles have emerged. You can see the difference in the overall texture of the flower with the curled petals and the upright styles.


My Telopea Speciosissima are next to flower and they continue to flower up until December, depending on where they are planted.  I have some beautiful ones including this special one that is rosy pink, with white styles.  Its currently my favourite!


Such a gorgeous flower!  I love the colour, the white styles, and the rounded shape of this flower.  I hope to do some propagating, to see if I can reproduce more of them.


A close-up of the freshly emerged styles of this flower reveal the way waratahs present their pollen.  On the inside tip of the white styles you can see the rich red pollen.   It can be messy if the flower is handled a lot.  The bees love it!


I have really enjoyed using waratahs in some weddings recently.  Such a gorgeous colour!


And creating cheery arrangements is fun.  Spring means there's so much to choose from to team up with that stunning rich red.


Waratahs are deservedly one of the most prized Australian native cut flowers.  I love growing them!